August 17, 2010
Change the values used for calculations in a Drop-Down list in Adobe LiveCycle
You have to do a little extra work with the drop-down list.
To the user, a drop-down list is nothing more than a list with the values shown that they can choose from. To the programmer, that would be you in this case, the actual value that the code can use doesn't have to resemble the value selected by the user at all. First, a little background history of drop-down lists.
Drop-down lists started out as a way to allow a user to select a single value from a list, which was usually stored in some type of table in a database. For both cost reasons (memory and storage used to be very expensive) and data integrity reasons (the more someone has to enter the same item, the greater the chance one of those entries is going to be entered incorrectly), programmers developed methods of entering data once but using it multiple times.
As an example, the user may see a list of fruits:
| Apples |
| Oranges |
| Bananas |
| Grapes |
To a user, this is just a list of fruits. To the programmer, it is a list of items and he really doesn't care what the items are, but everytime Oranges are selected, he needs to be sure he is referring to the same fruit. Rather than entering this list of fruits everytime he needs the user to select one, he enters the list of fruits into a table and then just reads the table and displays it to the user. Now he only needs the storage space to store the list of fruits once.
To save even more on storage space, each entry also gets an index number, so that the table now looks like this:
| 1 | Apples |
| 2 | Oranges |
| 3 | Bananas |
| 4 | Grapes |
If the user selects Oranges, the programmer only needs to store the index value of 2. This adds flexibilty in that now he only needs to write code once to display a drop-down list and all he has to change is what table the list is drawn from. Additionally, he can add more items to the list without having to redo any previous code or damaging any user entries he may have already received. Plus, to make it easier for the user to find an entry, especially in a long list, he can now sort the entries knowing the index value will always stay consistent.
The following tables shows two new entries added to the list (index value now does to 6 instead of 4) but is sorted alphabetically by the name of the fruit, instead of the order the fruits were entered into the table.
| 1 | Apples |
| 3 | Bananas |
| 6 | Cantaloup |
| 4 | Grapes |
| 2 | Oranges |
| 5 | Peaches |
Now, let's look at your issue with a drop-down list in Adobe LiveCycle.
Adobe LiveCycle is used to create interactive forms in Adobe Acrobat files. This allows companies to distribute forms that users can type directly into and can also perform calculations and other simple programming.
Since Adobe Acrobat files are usually distributed to end-users to use on their own PC's, they don't always have access to a database to be able to drawn a list from to populate a drop-down field. Luckily, the cost of memory and storage has dropped dramatically so that becomes less of an issue.
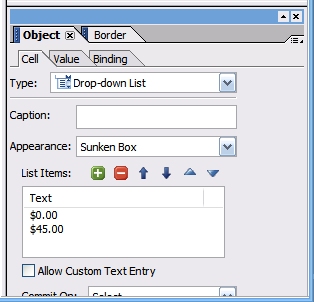
When you create a drop-down field in Adobe LiveCycle, you have to populate the drop-down list manually. This is done by adding the items in the drop-down controls properties, shown as you did in Image 1. Because Adobe LiveCycle doesn't expect to do much more than just display the chosen selection, by default it doesn't use a separate index or value field.

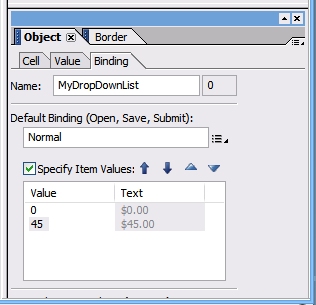
Since you are looking to do additional calculations on the item selected, you need to manually enter the index or value you want Adobe LiveCycle to return to your programming code whenever you reference the field. You can do this by clicking on the Binding tab of the drop-down controls properties.
Here you can specify a more meaningful name to your control and you can specify specific values for each item in your drop-down list. You can see I changed the name of the control and the values for each list item in Image 2.

Of course, this only gets you to where you are calculating on the right values. You will need to add some basic calculations to your form to get it to start adding things up for you. Best way to learn how to do that is to follow the tutorial included in the help file. Press F1 to open the help file, click on Quick Start Tutorials, and then click on "Creating a purchase order form". It is 26 lessons and you'll be able to skip the ones that you feel you already know.
Posted by Westley Annis at 8:36 PM | Comments (0) | TrackBack